经历过折腾各种CMS,买空间续域名之后,慢慢就懒得折腾了,最近的新冠肺炎使得只能憋在家里不能出门,便来尝试一下在GitHub上放一个博客,因为是个代码小白(大学里学了一个学期的Java早就还给老师了,从未接触过Git、Markdown、CI/CD),所以过程还是有些曲折,差不多花了三天时间完成了hexo搭建、部署及使用GitHub Actions进行hexo自动发布,现将相关过程记录如下,以备后查。
hexo搭建及部署
安装环境
根据Hexo 的官方文档的概述安装Git和node.js
安装Node.js: https://nodejs.org/en/download/
安装Git: git国内下载站
具体步骤参照上述官方文档。
安装hexo
使用 npm 安装 Hexo(小白我其实不懂npm什么意思)
随便找个文件夹或在桌面右键Git bash here,启动Git,输入命令:
1 | npm install -g hexo-cli |
建立要存放hexo相关文件的文件夹,如E:\Hexo,在此文件夹下右键Git bash here,输入命令进行初始化hexo:
1 | hexo init |
可以看到E:\Hexo文件夹下的目录如下:
1 | . |
config.yml 网站的配置信息,可以在此配置大部分的参数。
package.json #存放着插件信息,从中可以查看哪些插件已经安装。
scaffolds 模版文件夹,指在新建的文章文件中默认填充的内容。新建文章时,Hexo会根据scaffolds来建立文件,不过这个模板和后面的主题里指的模板不一样。
source 资源文件夹是存放用户资源的地方。除_posts 文件夹之外,开头命名为 _ (下划线)的文件 / 文件夹和隐藏的文件将会被忽略。Markdown 和 HTML 文件会被解析并放到 public 文件夹,而其他文件会被拷贝过去。
themes 主题文件夹,Hexo会根据主题来生成静态页面。
本地浏览博客
分别输入 如下命令:
1 | hexo g |
在浏览器打开 http://localhost:4000/ 即可看到那句著名的Hello World了。
hexo发布到github
打开站点的配置文件_config.yml(E:\Hexo文件夹下) 修改如下代码一边将Hexo推送到GitHub:
1 | deploy: |
安装Git部署插件,输入命令:
1 | npm install hexo-deployer-git --save |
设置user.name和user.email配置信息:
1 | git config --global user.name "你的GitHub用户名" |
生成ssh密钥文件:
1 | ssh-keygen -t rsa -C "你的GitHub注册邮箱" |
然后直接三个回车即可,默认不需要设置密码。
然后找到生成的.ssh的文件夹(如:C:\Users\Happy.ssh)中的id_rsa.pub密钥,将内容全部复制,打开GitHub_Settings_keys页面,新建new SSH Key :Title为标题,任意填即可,将刚刚复制的id_rsa.pub内容粘贴进去,最后点击Add SSH key。
在Git Bash中检测GitHub公钥设置是否成功,输入:
1 | ssh git@github.com |
看到这个就说明大功告成:
Hi username! You’ve successfully authenticated, but GitHub does not provide shell access.
说明:ssh,简单来讲,就是一个秘钥,其中,id_rsa是你这台电脑的私人秘钥,不能给别人看的,id_rsa.pub是公共秘钥,可以随便给别人看。把这个公钥放在GitHub上,这样当你链接GitHub自己的账户时,它就会根据公钥匹配你的私钥,当能够相互匹配时,才能够顺利的通过git上传你的文件到GitHub上。
发布到Github,输入如下命令:
1 | hexo clean && hexo g && hexo d |
注:需要上传的其他文件应置于 source 目录下,只有这样 hexo deploy 才能将相关文件一并推送至部署分支。
跳过指定文件的渲染:skip_render
1 | skip_render: |
说明:hexo d上传部署到github的其实是hexo编译后的文件,是用来生成网页的,不包含源文件。也就是上传的是在本地目录里自动生成的.deploy_git里面。其他文件包括配置文件、主题文件和我们写在source 里面的文件,都没有上传到github。所以源文件需单独上传到github的另一个分支或另一个库。
将源代码部署到GitHub
有两种不同的方法:
1.创建仓库:在GitHub上创建一个用于存储源码的库,建议选择“private”,这样博客的内容不会公开。
2.创建分支:不新建仓库,将源码放在博客界面doiyes.github.io所在仓库的另一分支中。
我这里采用创建仓库的方法,接着创建本地仓库文件夹如E:\HexoSource,在文件夹 git bash,输入下述命令,将其克隆到本地,以建立与GitHub的关联关系:
1 | git clone https://github.com/doiyes/hexo.git |
接下来在克隆到本地的hexo文件夹中,把除了.git 文件夹外的所有文件都删掉。把前面的博客源文件全部复制过来,除了.deploy_git。一些不需要的文件可以用文件.gitignore来忽略,如果没有的话,自己新建一个,在里面写上如下,表示这些类型文件不需要git:
1 | .DS_Store |
注意把 themes/next 目录下的 .git 文件夹删掉(因为git不能嵌套上传,最好是显示隐藏文件,检查一下有没有,否则上传的时候会出错,导致你的主题文件无法上传。需要更新主题时在另一个地方git clone下来该主题的最新版本,然后将内容拷到当前主题目录即可)
将准备好的源代码目录内容推送到 xxx分支:
1 | git add . |
相关命令介绍:这里
也可以输入以下命令进行本地仓库与远程仓库关联:
1 | git init # 初始化本地仓库 |
使用GitHub Actions进行hexo自动发布
修改配置文件
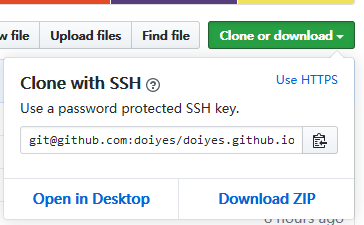
_config.yml 里 deploy 的 repo 地址换成 SSH 地址(仓库页面 Clone and Download - Use SSH 里的地址),以便后面用密钥 push 到仓库。
1 | deploy: |
github配置及key
新建仓库或分支,在仓库的 Settings -> Secrets 里添加刚刚生成的私钥,名称为 ACTION_DEPLOY_KEY(可以修改)在 Value 框里填入本地文件 ~/.ssh/github-actions-deploy 的文件内容。
然后在 Github Pages 的仓库,Settings -> Deploy keys 添加刚刚生成的公钥,名称随意,但要勾选 Allow write access。
在Actions新建new workflows(或在目录下创建 .github/workflow/your-action-name.yml):
1 | # workflow name |
或:
1 | name: Node CI |
查看执行情况
可以去项目仓库的 actions 查看每个 workflow 的执行情况。![]()
注:本文旨在打通Hexo的安装与部署流程,Hexo及主题的配置与插件安装将另行一文。